1. Connect ssh to ec2 instance.
2. install vncserver:
sudo apt install ubuntu-desktop
sudo apt install vnc4server
sudo apt install gnome-panel
3. Type 'vncserver' to setup pwd
4. Kill vncserver 'vncserver -kill :1'
5. Type following:
vim /home/ubuntu/.vnc/xstartup
and modify
unset SESSION_MANAGER
# exec /etc/.....
gnome-session -session=gnome-classic &
gnome-panel&
('ESC', ':wq', 'ENTER' to quit vim)
Type 'vncserver' to start.
Download TightVNC Viewer to connect.
In AWS website, to set "Inbound rule" to allow connections, with IP::port
Tensorflow with AWS: https://aws.amazon.com/cn/blogs/china/tensorflow-on-aws/
2017年5月1日星期一
2016年9月26日星期一
Ubuntu install lists
A list of post installation of Ubuntu
sudo apt-get install freeglut3-dev build-essential libx11-dev libxmu-dev libxi-dev libgl1-mesa-glx libglu1-mesa libglu1-mesa-dev
sudo apt-get update
sudo apt-get upgrade
Google Chrome
http://cn.soulmachine.me/2016-08-17-deep-learning-cuda-development-environment/
Driver:
sudo add-apt-repository ppa:graphics-drivers/ppa
sudo apt-get update
sudo apt-get install nvidia-375 (gforce) -377(quadro)
1. 'stop x server'
'Ctrl + Alt + F1' ===> terminal
sudo service lightdm stop
2. download and install driver
sudo sh NVIDIA.......
Cuda #install
sudo sh cuda_8.0.27_linux.run --tmpdir=/tmp --override
sudo sh cuda_8.0.27.1_linux.run
~/.bashrc
export PATH=/usr/local/cuda-8.0/bin${PATH:+:${PATH}}
export LD_LIBRARY_PATH=/usr/local/cuda-8.0/lib64${LD_LIBRARY_PATH:+:${LD_LIBRARY_PATH}}
#test
cd ~/NVIDIA_CUDA-8.0_Samples/1_Utilities/deviceQuery
make
./deviceQuery
cd ~/NVIDIA_CUDA-8.0_Samples/5_Simulations/nbody/
make
./nbody -benchmark -numbodies=256000 -device=0
Output:
> Windowed mode

> Simulation data stored in video memory

> Single precision floating point simulation

> 1 Devices used for simulation

gpuDeviceInit() CUDA Device [0]: "GeForce GTX 1080

> Compute 6.1 CUDA device: [GeForce GTX 1080]

number of bodies = 256000

256000 bodies, total time for 10 iterations: 2364.286 ms

= 277.192 billion interactions per second

= 5543.830 single-precision GFLOP/s at 20 flops per interaction
cuDNN
'copy ../cuda/include/*.h to /usr/local/cuda-8.0/include/'
'copy ../cuda/lib64/*.* to /usr/local/cuda-8.0/lib64'
**'/usr/local/cuda-8.0' is the path where CUDA installed.
Tensorflow
sudo apt-get install libcurl3-dev
$ conda install virtualenv # suggested by the output of terminal not using pip install
$ conda create --name=tensorflow_env python=3.5
$ source activate tensorflow_env
$ pip install --upgrade https://storage.googleapis.com/tensorflow/linux/cpu/tensorflow-0.5.0-cp27-none-linux_x86_64.whl # the code you provided is for the python 3
(to delete env: conda env remove --name tensorflow)
Rebuild tensorflow with CUDA!!!
https://alliseesolutions.wordpress.com/2016/09/08/install-gpu-tensorflow-from-sources-w-ubuntu-16-04-and-cuda-8-0-rc/
Note:
1. Install protobuf 3.0!!MUST BE 3.0
pip install protobuf3
2. MUST downloads tensorflow from online, NOT get from the command line!!!
In build:
$ bazel build -c opt --config=cuda //tensorflow/tools/pip_package:build_pip_package
$ bazel-bin/tensorflow/tools/pip_package/build_pip_package ~/Downloads/tensorflow_pkg
$ sudo pip3 install ~/Downloads/tensorflow_pkg/tensorflow-0.10.0-py3-none-any.whl
######==========================================================================
Caffe:
http://caffe.berkeleyvision.org/installation.html#prerequisites
In compiling opencv, BEFORE 'make':
In file 'modules/cudalegacy/src/graphcuts.cpp' change:
-#if !defined (HAVE_CUDA) || defined (CUDA_DISABLER)
+// GraphCut has been removed in NPP 8.0
+#if !defined (HAVE_CUDA) || defined (CUDA_DISABLER) || (CUDART_VERSION >= 8000)
prereqisites:
1. protobuf
sudo apt-get install autoconf automake libtool curl make g++ unzip
2. glog, etc..
3. hdf5sudo apt-get install libgflags-dev libgoogle-glog-dev liblmdb-dev
sudo apt-get install hdf5-tools
cd /usr/lib/x86_64-linux-gnu
sudo ln -s libhdf5_serial.so.10.1.0 libhdf5.so
sudo ln -s libhdf5_serial_hl.so.10.0.2 libhdf5_hl.so
Changes in Makefile.config
Uncomment 'OPENCV_VERSION := 3', 'USE_CUDNN := 1', 'ANACONDA_HOME := $(HOME)/anaconda3/envs/caffe/', 'PYTHON_INCLUDE := $(ANACONDA_HOME)/include \
# $(ANACONDA_HOME)/include/python3.5 \
# $(ANACONDA_HOME)/lib/python3.5/site-packages/numpy/core/include \', 'USE_PKG_CONFIG := 1'
(BEFORE 'make all' for caffe)
find . -type f -exec sed -i -e 's^"hdf5.h"^"hdf5/serial/hdf5.h"^g' -e 's^"hdf5_hl.h"^"hdf5/serial/hdf5_hl.h"^g' '{}' \;
mkdir build
cd build
cmake ..
make all      (Or cmake -DWITH_IPP=ON . && make -j $(nproc) && make install???)
make install
make runtest
C++
CodeBlocks:
sudo add-apt-repository ppa:damien-moore/codeblocks-stable
sudo apt-get update
Anaconda
Pycharm:
sudo add-apt-repository ppa:mystic-mirage/pycharm
sudo apt-get update
sudo apt-get install pycharm-comminity
Notepad++:
sudo add-apt-repository ppa:notepadqq-team/notepadqq

sudo apt-get update

sudo apt-get install notepadqq
2016年3月16日星期三
Install Pyspark in Windows and with PyCharm!!!
Build Spark environment for Windows command line.
Paths added in this session are for Win environment by default.
1. Install java JDK to ..\Java\jdk1.8.0_74
Add path ..\Java\jdk1.8.0_74;..\Java\jdk1.8.0_74\bin
2. Install scala to ..\scala
Add path ..\scala\bin
3. DONOT!!! Install Python 3
3. Install Anaconda3 and ADD PATH the most front!!
4. Download the latest prebuilt Spark to ..\Spark\spark-1.6.1
Add path: ..\Spark\spark-1.6.1;..\Spark\spark-1.6.1\bin
5. SPARK_HOME = ..\Spark\spark-1.6.1
Download hadoop "winutils.exe" etc. files.
HADOOP_HOME = ../hadoop/hadoop-common-2.2.0-bin-master
Now java, scala, and spark can all be run in command line in windows.
======================================================================
Next, go further for PyCharm IDE
Paths added in this session are for "current-project" settings in Run\EditConfigurations.
6. Install PyCharm
7. Add Environment Variables in PyCharm IDE
PYTHONPATH = ../Spark/spark-1.6.1/python;/Spark/spark-1.6.1/python/lib/py4j-0.9-src.zip;..\hadoop\hadoop-common-2.2.0-bin-master\bin
HADOOP_HOME = ../hadoop/hadoop-common-2.2.0-bin-master
SPARK_HOME = Spark/spark-1.6.1
=======================================================================
To be further tested and simplified!
Paths added in this session are for Win environment by default.
1. Install java JDK to ..\Java\jdk1.8.0_74
Add path ..\Java\jdk1.8.0_74;..\Java\jdk1.8.0_74\bin
2. Install scala to ..\scala
Add path ..\scala\bin
3. DONOT!!! Install Python 3
3. Install Anaconda3 and ADD PATH the most front!!
4. Download the latest prebuilt Spark to ..\Spark\spark-1.6.1
Add path: ..\Spark\spark-1.6.1;..\Spark\spark-1.6.1\bin
5. SPARK_HOME = ..\Spark\spark-1.6.1
Download hadoop "winutils.exe" etc. files.
HADOOP_HOME = ../hadoop/hadoop-common-2.2.0-bin-master
Now java, scala, and spark can all be run in command line in windows.
======================================================================
Next, go further for PyCharm IDE
Paths added in this session are for "current-project" settings in Run\EditConfigurations.
6. Install PyCharm
7. Add Environment Variables in PyCharm IDE
PYTHONPATH = ../Spark/spark-1.6.1/python;/Spark/spark-1.6.1/python/lib/py4j-0.9-src.zip;..\hadoop\hadoop-common-2.2.0-bin-master\bin
HADOOP_HOME = ../hadoop/hadoop-common-2.2.0-bin-master
SPARK_HOME = Spark/spark-1.6.1
=======================================================================
To be further tested and simplified!
2015年7月16日星期四
【转载】如何将文章发表在高影响因子的期刊上
原文地址:
http://blog.sciencenet.cn/blog-502444-879588.html
做学术研究的人,都知道一个著名的短语“Publish or perish”。就是说,研究人员,发表文章是硬道理,只有快速而持续在某些专业领域发表自己的研究成果,才能在学术界占领高地,让自己走得更远。无论大家如何评价学术论文发表对科学和社会的贡献,学术圈实质上的游戏规则,一直没有太大改变:对研究人员来说,发表论文是硬通货,是他们获得职位、争取资源、赢得荣誉的重要途经与手段。目前,杂志数量爆发式增长,研究人员在发表论文的时候有了更多的选择,但同时也给学术评估带来了不小的麻烦,于是评估人员只好依赖于期刊质量指标来评定研究质量。比如汤普森的影响因子,就是为了将这个复杂而微妙的判定简化为一个数字,这也是目前业内使用最广泛的指标。理论上,影响因子似乎是期刊所发表研究的质量,但这一假设目前受到越来越多的质疑。学术圈的人都深切体会到,一篇文章能否在某个期刊最终发表出来,除了科学质量方面的因素外,还有其他一些很重要的因素。
比如,我们一直在告诫学生,一篇稿件在写作风格、突出重点和表达上少许的差别就可能影响杂志的接收情况。那么,这只是老道的论文作者的感觉,还是不同期刊上文章的表达真的存在着这些差别呢?如果这些差别真的存在,那么是否表明影响因子真的与科学质量以外的东西有关,作者是否可以通过改善一些相对简单的写作技巧来提高他们在高影响因子期刊上发表论文的机会呢?在竞争激烈的学术圈,年轻的研究人员和学生们必须尽可能发表更多的论文,也希望最大限度地争取在“好”的刊物上发表文章的机会,那么应该怎么做呢?美国南伊利诺斯大学的Brady Neiles及其同事在最近一期的Bulletin of the Ecological Society of America上撰文,分析了不同影响因子期刊中发表的论文,指出:在这种竞争激烈的环境下,作者如果要让他们的稿件脱颖而出,改善写作风格可能是一个有效的手段。有力的科学写作手段也可看作是某种程度的“推销”和“讲故事”,作者必须找到如何创造性地讲故事,并清晰地表达这些发现的重要性。
这篇文献研究工作从10个期刊中各挑选了12篇论文,这10本生态学期刊的影响因子的差异很大(根据2011年的Ifs,分别从0.619至17.557不等),而12篇文章是通过随机数发生器挑选的。研究人员首先将文章从PDF格式转化成XML格式,并整理成标准格式,移除标题、作者机构、关键词、图形及其标题以及表格等会干扰文本分割的内容。在这个基础上,评估了30多个写作参数,大致分为语法、数字的使用和各部分的比例长度等(详细内容,请阅读原文,很长的一个表格)。为了保证一致性,每个参数都由同一位分析人员负责收集。之后,用多变量方差分析(MANOVA)来测试影响因子对每个写作风格变量的影响。在进行探索性分析中,他们从全局模型开始,然后剔除所有P > 0.06的变量,获得最终的模型。最后根据IF将期刊分成了三大类别进行交叉对比(表1)。不是生态学领域的人员,也许对Ecology Letters这个杂志不熟悉,这里做一个简单说明:生态学的刊物大多IF不高,平均在2~3之间,而Ecology Letters则是个怪胎,IF在2011年和2012年分别高达17.557和17.949,不过2013年下降到13.042,但总体上仍然是生态学中IF遥遥领先的期刊,因此这篇论文将Ecology Letters划分成单独一组来分析,还是有一定道理的。
表1 分析中所用到的期刊及其影响因子和分类
总体上,模型显示期刊间有极其显著的差异(P < 0.0001),当然这些变量有相当大的噪音,但一些模式是非常明显的。Ecology Letters中的论文经常会在标题中包含结果(P<= 0.057),而最低IF期刊中的文章很少这样写。低IF期刊中的文章更喜欢在标题中包含一个物种,而高IF期刊中的文章更喜欢在标题中包含研究地。Ecology Letters中的文章包含更多的预测数据,而低IF期刊中包含更少的预测数据。最低的IF期刊包含更多的数据表、地图和图片。低IF期刊中的文章段落较长,Ecology Letters中的文章段落较短。低IF期刊中所引用的论文也来自低IF期刊,而Ecology Letters中所引用的文章更多来自高IF期刊。
这个结果说明了不同IF期刊上所发表论文的简单文体差异。尽管这些模式还不是很明确,但确实说明了高IF学术期刊要求论文写的更简洁一些,视野更广一些。例如,较高IF期刊要求在标题中说明结果,而较低IF期刊经常提到所研究的物种,这说明较高IF期刊希望论文关注一个问题,而较低IF期刊中的论文则是关注一个具体的生态系统。较高IF期刊上的论文往往有更多的详述假设的预测数据,而较低IF期刊上的论文只是有更多的数据表、地图和数字,说明了二者的焦点是不同的。令人惊讶的是,不同IF的期刊,语法没有什么太大差别,唯一的区别是段落的长短。也许,编辑人员最终对文章的决定权,模糊了不同写作风格之间的差异。
这个结果为年轻学者进军出版领域提供了一定的洞见。文章作者最后也强调了Gaming the system的问题,所以希望科学质量是影响出版质量的最主要因素,而不是推销技巧,然而这又的确是一个不容忽视的因素。
http://blog.sciencenet.cn/blog-502444-879588.html
做学术研究的人,都知道一个著名的短语“Publish or perish”。就是说,研究人员,发表文章是硬道理,只有快速而持续在某些专业领域发表自己的研究成果,才能在学术界占领高地,让自己走得更远。无论大家如何评价学术论文发表对科学和社会的贡献,学术圈实质上的游戏规则,一直没有太大改变:对研究人员来说,发表论文是硬通货,是他们获得职位、争取资源、赢得荣誉的重要途经与手段。目前,杂志数量爆发式增长,研究人员在发表论文的时候有了更多的选择,但同时也给学术评估带来了不小的麻烦,于是评估人员只好依赖于期刊质量指标来评定研究质量。比如汤普森的影响因子,就是为了将这个复杂而微妙的判定简化为一个数字,这也是目前业内使用最广泛的指标。理论上,影响因子似乎是期刊所发表研究的质量,但这一假设目前受到越来越多的质疑。学术圈的人都深切体会到,一篇文章能否在某个期刊最终发表出来,除了科学质量方面的因素外,还有其他一些很重要的因素。
比如,我们一直在告诫学生,一篇稿件在写作风格、突出重点和表达上少许的差别就可能影响杂志的接收情况。那么,这只是老道的论文作者的感觉,还是不同期刊上文章的表达真的存在着这些差别呢?如果这些差别真的存在,那么是否表明影响因子真的与科学质量以外的东西有关,作者是否可以通过改善一些相对简单的写作技巧来提高他们在高影响因子期刊上发表论文的机会呢?在竞争激烈的学术圈,年轻的研究人员和学生们必须尽可能发表更多的论文,也希望最大限度地争取在“好”的刊物上发表文章的机会,那么应该怎么做呢?美国南伊利诺斯大学的Brady Neiles及其同事在最近一期的Bulletin of the Ecological Society of America上撰文,分析了不同影响因子期刊中发表的论文,指出:在这种竞争激烈的环境下,作者如果要让他们的稿件脱颖而出,改善写作风格可能是一个有效的手段。有力的科学写作手段也可看作是某种程度的“推销”和“讲故事”,作者必须找到如何创造性地讲故事,并清晰地表达这些发现的重要性。
这篇文献研究工作从10个期刊中各挑选了12篇论文,这10本生态学期刊的影响因子的差异很大(根据2011年的Ifs,分别从0.619至17.557不等),而12篇文章是通过随机数发生器挑选的。研究人员首先将文章从PDF格式转化成XML格式,并整理成标准格式,移除标题、作者机构、关键词、图形及其标题以及表格等会干扰文本分割的内容。在这个基础上,评估了30多个写作参数,大致分为语法、数字的使用和各部分的比例长度等(详细内容,请阅读原文,很长的一个表格)。为了保证一致性,每个参数都由同一位分析人员负责收集。之后,用多变量方差分析(MANOVA)来测试影响因子对每个写作风格变量的影响。在进行探索性分析中,他们从全局模型开始,然后剔除所有P > 0.06的变量,获得最终的模型。最后根据IF将期刊分成了三大类别进行交叉对比(表1)。不是生态学领域的人员,也许对Ecology Letters这个杂志不熟悉,这里做一个简单说明:生态学的刊物大多IF不高,平均在2~3之间,而Ecology Letters则是个怪胎,IF在2011年和2012年分别高达17.557和17.949,不过2013年下降到13.042,但总体上仍然是生态学中IF遥遥领先的期刊,因此这篇论文将Ecology Letters划分成单独一组来分析,还是有一定道理的。
表1 分析中所用到的期刊及其影响因子和分类
总体上,模型显示期刊间有极其显著的差异(P < 0.0001),当然这些变量有相当大的噪音,但一些模式是非常明显的。Ecology Letters中的论文经常会在标题中包含结果(P<= 0.057),而最低IF期刊中的文章很少这样写。低IF期刊中的文章更喜欢在标题中包含一个物种,而高IF期刊中的文章更喜欢在标题中包含研究地。Ecology Letters中的文章包含更多的预测数据,而低IF期刊中包含更少的预测数据。最低的IF期刊包含更多的数据表、地图和图片。低IF期刊中的文章段落较长,Ecology Letters中的文章段落较短。低IF期刊中所引用的论文也来自低IF期刊,而Ecology Letters中所引用的文章更多来自高IF期刊。
这个结果说明了不同IF期刊上所发表论文的简单文体差异。尽管这些模式还不是很明确,但确实说明了高IF学术期刊要求论文写的更简洁一些,视野更广一些。例如,较高IF期刊要求在标题中说明结果,而较低IF期刊经常提到所研究的物种,这说明较高IF期刊希望论文关注一个问题,而较低IF期刊中的论文则是关注一个具体的生态系统。较高IF期刊上的论文往往有更多的详述假设的预测数据,而较低IF期刊上的论文只是有更多的数据表、地图和数字,说明了二者的焦点是不同的。令人惊讶的是,不同IF的期刊,语法没有什么太大差别,唯一的区别是段落的长短。也许,编辑人员最终对文章的决定权,模糊了不同写作风格之间的差异。
这个结果为年轻学者进军出版领域提供了一定的洞见。文章作者最后也强调了Gaming the system的问题,所以希望科学质量是影响出版质量的最主要因素,而不是推销技巧,然而这又的确是一个不容忽视的因素。
参考文献:
Brady Neiles, Charleve S. Carey, AlessandraAraujo, David Burkhart, Lucas J. Kirschman, Brandon LaBumbard, Seth LaGrange,Josiah J. Maine, Artur M. Rombenso, Michelle N. Wood, and Justin G. Boyles, 2015. Writing Your Way into High Impact Factor Journals. Bulletin of the Ecological Society of America 96:312–316.
2015年6月21日星期日
[Cited] Extremely Swirly Bokeh – Short Tutorial
Extremely Swirly Bokeh – Short Tutorial
Original Link:
http://www.verybiglobo.com/extremely-swirly-bokeh-short-tutorial/
Here is my story…
Over years, I collected some 20+ Helios 44 lenses. (If you never heard of this lens, it is Russian copy of Zeiss Biotar 58/2, one of my favorite standard lenses). I did so partially out of curiosity to see how many variations I might discover (it is believed that anyone who would like to learn about all Russian lens variations, would need highest degree on the Hogwarts University) and partially because they are real bargain, being made in huge numbers.
Few days ago, I found an offer on our local Craig’s list, for the Specially adapted Helios. There was a link to the images made with that particular lens and when I opened the link, I was surprised to see images similar to this one:
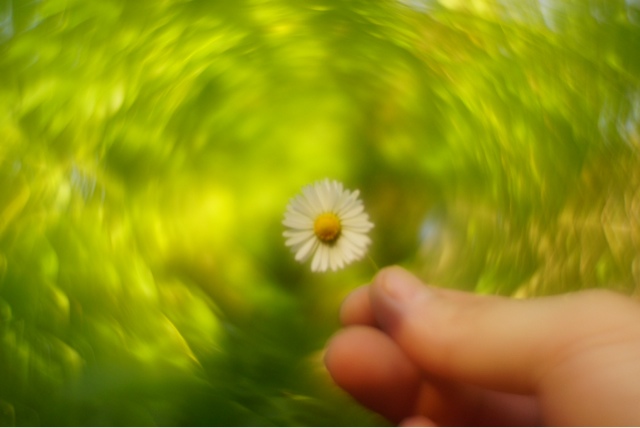
Helios 44 (Just like Biotar 58/2) are one of those lenses known for so called Swirly bokeh, but I never saw image with a bokeh that wild.
I started to search on the web, and found some crazy adaptations of Helios, but they were going in the opposite direction, adding apodizing filters close to the aperture, to smooth highlights and tonal transitions. Apodizing filter is basically neutral density circular filter that is letting less light to pass in the edges of the image than in the center. Check the Minolta 135/2.8 STF review on my blog or search the web to find more about apodizing filter effects.
What I was able to find were some rather crazy adaptations going in that direction, like rotation of the Helios rear lens element above small candle for a quite long time, to make a soot that will block the light! It look like barbecue party!
Spending quite some time in that wrong direction, I finally dig few bits of info about making background more crazy.
The rest of the story is here – after many trial/error efforts, I can tell you my dear friends, how to make images like those, of course only if you have twisted sense of humor…

Before I tell you how to adapt your Helios, I should mention that it can be made with most lenses. Helios is great mainly because, it is widely available and not expensive. The images that you can see here are not made with Helios, but with another lens that I would like to keep as my little secret so far  But Helios 44 adapted, will give you almost identical results.
But Helios 44 adapted, will give you almost identical results.
What would you need?
- Time
- Space
- Microfiber cloth to put bellow the lens
- Photographic gloves, because you will touch the glass
- 1 x table spoon of Helios 44 (I used 44-2, but as there are many different versions of this Helios, I can’t guarantee that it will be the same procedure with others. But I think so.)
- Lens opener. (Yeah, what the hell is lens opener? You will need to unscrew protective rim on the front of the lens, which is keeping front lens element tight on its place. There are many ideas on the web how to make your own opener, I am using a plumber rubber tape (very elastic tape made of rubber, that doesn’t leave marks) and put it around anything that has slightly smaller diameter than the lens top. Some people are using reversed lens cover and piece of chewing gum. You can even buy some rubber discs on eBay made specially on purpose – http://www.ebay.com/itm/18-Sizes-Pro-Rubber-Lens-Repair-for-DSLR-lens-Openning-Tool-Open-Wrench-fix-/261456322469?pt=Digital_Camera_Accessories&hash=item3ce002dfa5
- Beer. To celebrate if you succeed, or relax if you don’t.
And here is the trick.
Remove protective rim on top of the lens with the opener of your choice. Carefully turn the lens until front glass doesn’t fall into your palm (gloves remember?) Reverse the glass and carefully place it back where it was. Tighten up protective rim again. Done, drink a beer, mount the lens and run out to try it!
BTW, it might happen, that reversed glass will touch the elements bellow, but that is the price for this SFX adaptation and considering the price of Helios 44-2, I think you can live with it. In the worst case scenario, your adaptation might be permanent.
As you can see, trick is very simple – reversed front lens element. But there is more to come, and that is part of the fun…
If you want to enjoy your own research, trials/errors and excitement when you find out how to make those images, stop reading right here! Take your lens and go experimenting,
That’s what I did anyway. My first attempts were not really promising. Looking on those images, I first tought, that I need backlight to get lot of highlights. The opposite is true. You would need direct sunlight on your background, but also some highlights in it. Foliage makes a perfect pattern.
Be sure to have light behind you, if you want maximum effect.
Distance from the background is extremely important. There is no general rule, as it will depend of the structure of the background – size of the leaves e.g. and light direction. For this one you have to experiment. Here is what I would suggest – First – decide what will be your main subject and try to compose it the way you like it. Now focus on that distance (to have your subject sharp) and start looking for the swirly background. You will find it in the leaves, grass etc. Adjust your distance to the background accordingly and bring your subject in the frame, or if the subject is on the ground level (most flowers are), turn around, up and down to see if the Mr. Swirly is somewhere there.
Aperture should be usually wide open, but in some situations you might try to close it a bit. It all depends on the background.
Water drops might create great additional effects. In front of your focus plane (shooting through the grass with morning dew e.g) they will make interesting arrow like shapes, while in background they will create stroked circles. This will work best in macro magnifications (water drops are small, right?) You can use a small spray bottle with water if you are lazy (like me) to wake-up early. If you want to be like a pro, you might use glycerin instead of the water and virtually create your own water drops, bigger and more durable, exactly where you want them. And if it is cloudy day, or your subject is in the shade, use flash.
Try different subjects and different backgrounds. I played with leaves mostly, but there are some urban structures and patterns that might work equally well, such as glass block walls e.g. Sometimes, you want less complicated swirl…

That is basically it. If you can’t find your own Helios 44, or if you are afraid of doing this modification. I can make one for you for around 99 USD (including lens of course), plus shipping. You can also try to do this or similar modification with any older lens that you have at home. Some lenses will make interesting effect when you take out rear element or reverse it. (In most cases you will lose infinity though). Also consider to put your Helios (M42 mount) on the adapter with focus hellicoid. That will give you some interesting macro options.
But most importantly, TWIST AND HAVE FUN!!!

BTW, my very first image that I made with adapted Helios 44-2, make it on Flickr into explore group with some 20 faves and over 1000 views in the first 24 hours.
Check it here – https://www.flickr.com/photos/viktor_viktor/14172687000/

订阅:
博文 (Atom)